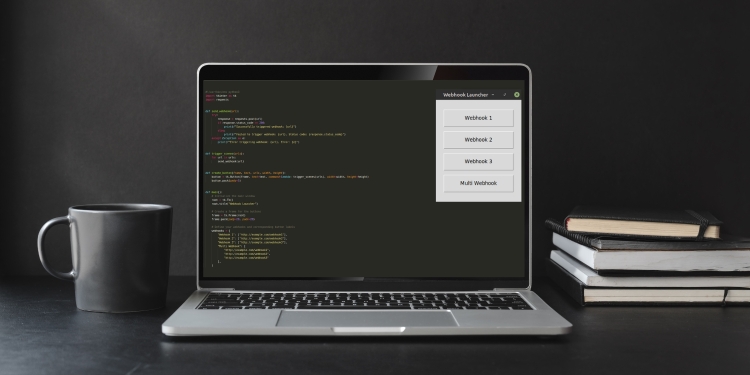
In this article, I will walk you through the process of creating a simple yet powerful Python GUI application to launch webhooks. This application will feature buttons that, when clicked, trigger webhooks to perform various actions. By the end of this tutorial, you’ll have a fully functional GUI application capable of sending multiple webhooks with a single button press.
Webhooks are a powerful tool that allow you to send real-time data from one application to another whenever a given event occurs. In this tutorial, I’ll leverage Python’s tkinter library to create a graphical user interface (GUI) that sends HTTP POST requests (webhooks) to specified URLs. This project is ideal for those who have some experience with Python and are interested in expanding their skills into GUI development and web integrations.
Prerequisites
Before I begin, make sure you have the following:
- Basic Knowledge of Python Programming: You should be familiar with Python syntax and basic programming concepts. Understanding functions, loops, and error handling will be beneficial.
- Python 3.x Installed: Ensure that Python 3.x is installed on your system. You can download the latest version of Python from the official Python website.
- Requests Library Installed: The requests library is used for sending HTTP requests in Python. If you don’t have it installed, you can install it using pip. Open your terminal or command prompt and run the following command:
pip install requests
- Tkinter Library: Tkinter is the standard GUI library for Python. It usually comes pre-installed with Python. To check if Tkinter is installed, you can run a simple import in Python:
import tkinter
If you don’t encounter any errors, Tkinter is installed correctly.
- Webhook URLs: You’ll need the URLs for the webhooks you want to trigger. These URLs can usually be found in the API documentation or settings of the service you are integrating with. Make sure these URLs are accessible and that you have the necessary permissions to send requests to them.
By ensuring you have all these prerequisites, you’ll be well-prepared to follow along with the tutorial and create a functional Python GUI application to launch webhooks.
Writing the Python Script
Open your Python editor or IDE and create a new Python file, webhook_launcher.py, where you will write your script.
First, I need to import the necessary libraries. tkinter is used for creating the GUI, and requests is used for sending HTTP requests.
#!/usr/bin/env python3
import tkinter as tk
import requests
Next, I’ll define the functions needed for our application:
The send_webhook function sends a POST request to the given URL and prints whether the request was successful.
# Function to send a webhook request
def send_webhook(url):
    try:
        # Send a POST request to the given URL
        response = requests.post(url)
        # Check if the request was successful
        if response.status_code == 200:
            print(f"Successfully triggered webhook: {url}")
        else:
            print(f"Failed to trigger webhook: {url}, Status code: {response.status_code}")
    except Exception as e:
        # Print the error if the request fails
        print(f"Error triggering webhook: {url}, Error: {e}")
The trigger_scenes function takes a list of URLs and sends a webhook request for each URL.
# Function to trigger multiple webhooks (scenes)
def trigger_scenes(urls):
    # Iterate through the list of URLs and send a webhook for each
    for url in urls:
        send_webhook(url)
The create_button function creates a button in the GUI with the specified text, dimensions, and webhooks.
# Function to create a button in the GUI
def create_button(frame, text, urls, width, height):
    # Create a button with the specified text and dimensions
    button = tk.Button(frame, text=text, command=lambda: trigger_scenes(urls), width=width, height=height)
    # Add some padding and pack the button into the frame
    button.pack(pady=5)
The main function sets up the GUI, creates buttons for each webhook, and starts the main event loop.
# Main function to set up the GUI
def main():
    # Initialize the main window
    root = tk.Tk()
    root.title("Webhook Launcher")

    # Create a frame to hold the buttons
    frame = tk.Frame(root)
    frame.pack(pady=20, padx=20)

    # Define webhooks and corresponding button labels
    webhooks = {
        "Webhook 1": ["http://example.com/webhook1"],
        "Webhook 2": ["http://example.com/webhook2"],
        "Webhook 3": ["http://example.com/webhook3"],
        "Multi Webhook": [
            "http://example.com/webhook1",
            "http://example.com/webhook2",
            "http://example.com/webhook3"
        ],
    }

    # Define button dimensions
    button_width = 20
    button_height = 2

    # Create buttons for each webhook
    for label, urls in webhooks.items():
        create_button(frame, label, urls, button_width, button_height)

    # Run the main event loop
    root.mainloop()
Finally, add the main block to execute the main function when the script is run directly.
# Execute the main function when the script is run directly
if __name__ == "__main__":
    main()
Full Code
Here is the complete code for the webhook launcher:
#!/usr/bin/env python3
import tkinter as tk
import requests

# Function to send a webhook request
def send_webhook(url):
    try:
        # Send a POST request to the given URL
        response = requests.post(url)
        # Check if the request was successful
        if response.status_code == 200:
            print(f"Successfully triggered webhook: {url}")
        else:
            print(f"Failed to trigger webhook: {url}, Status code: {response.status_code}")
    except Exception as e:
        # Print the error if the request fails
        print(f"Error triggering webhook: {url}, Error: {e}")

# Function to trigger multiple webhooks (scenes)
def trigger_scenes(urls):
    # Iterate through the list of URLs and send a webhook for each
    for url in urls:
        send_webhook(url)

# Function to create a button in the GUI
def create_button(frame, text, urls, width, height):
    # Create a button with the specified text and dimensions
    button = tk.Button(frame, text=text, command=lambda: trigger_scenes(urls), width=width, height=height)
    # Add some padding and pack the button into the frame
    button.pack(pady=5)

# Main function to set up the GUI
def main():
    # Initialize the main window
    root = tk.Tk()
    root.title("Webhook Launcher")

    # Create a frame to hold the buttons
    frame = tk.Frame(root)
    frame.pack(pady=20, padx=20)

    # Define webhooks and corresponding button labels
    webhooks = {
        "Webhook 1": ["http://example.com/webhook1"],
        "Webhook 2": ["http://example.com/webhook2"],
        "Webhook 3": ["http://example.com/webhook3"],
        "Multi Webhook": [
            "http://example.com/webhook1",
            "http://example.com/webhook2",
            "http://example.com/webhook3"
        ],
    }

    # Define button dimensions
    button_width = 20
    button_height = 2

    # Create buttons for each webhook
    for label, urls in webhooks.items():
        create_button(frame, label, urls, button_width, button_height)

    # Run the main event loop
    root.mainloop()

# Execute the main function when the script is run directly
if __name__ == "__main__":
    main()
Understanding the Code
Let’s break down what each part of the code does. I start by importing the necessary libraries. The tkinter library is used to create the graphical user interface (GUI), and the requests library is used to send HTTP POST requests to our webhooks.
Next, I define the send_webhook function, which sends a POST request to the specified URL. It prints a success message if the request is successful and an error message if the request fails.
The trigger_scenes function takes a list of URLs and sends a webhook for each URL by calling the send_webhook function.
The create_button function creates a button in the GUI. Each button has a specified text label, width, and height. When the button is clicked, it triggers the webhooks associated with that button.
The main function sets up the main window and a frame to hold the buttons. It defines a dictionary of webhooks, where each key is a button label and each value is a list of URLs to be triggered. The function then creates buttons for each webhook and runs the main event loop to keep the GUI active.
The main block ensures that the main function is called only when the script is executed directly, not when it is imported as a module.
Customizing Your Control Panel
To add more webhooks, simply update the webhooks dictionary in the main function. Each key-value pair in the dictionary represents a button label and a list of URLs to be triggered when the button is clicked.
For example, to add a new webhook, you can modify the dictionary as follows:
webhooks = {
    "New Webhook": ["http://example.com/new_webhook"],
    # Add more webhooks here
}
You can change the dimensions of the buttons by modifying the button_width and button_height variables in the main function. For example:
button_width = 25
button_height = 3
You can further customize the layout of the GUI by modifying the frame settings or adding additional frames and widgets. For example:
frame = tk.Frame(root, bg="lightblue")
frame.pack(pady=20, padx=20, fill="both", expand=True)
Running the Application
To run the application, execute the script from your terminal or command prompt:
python control_panel.py
You should see a window with buttons corresponding to the defined webhooks. Clicking a button will send the associated webhooks and print the results in the terminal.
Troubleshooting
If you encounter any issues, here are some common troubleshooting steps.
- Check that the webhook URLs are correct and reachable from your machine.
- Ensure that your computer is connected to the internet if the webhooks require external access.
- Make sure you are using the correct Python environment and have all required libraries installed.
- Pay attention to error messages printed in the terminal to diagnose issues.
Conclusion
In this tutorial, I’ve demonstrated how to create a simple Python GUI application to launch webhooks. Using the tkinter library for the GUI and the requests library to send HTTP POST requests, you can easily control various web services from a single interface. This project provides a great way to enhance your Python programming skills, particularly in GUI development and working with webhooks.
Feel free to expand and customize this application to meet your specific needs. Whether you’re adding more webhooks, creating complex actions, or enhancing the GUI, the possibilities are endless.


