• Home
  • Guides
    • All
    • Linux
    • Programming
    • Tools
    • WordPress
    My Backup Setup for Linux PCs

    My Backup Setup for Linux PCs

    Detecting Hidden WordPress Malware Disguised as Images

    Detecting Hidden WordPress Malware Disguised as Images

    Server-Side Image Conversion with Apache

    Server-Side Image Conversion with Apache

    Fastest Way to Extract a Massive .tar.gz File on Linux

    Fastest Way to Extract a Massive .tar.gz File on Linux

    Monitor SSL Expiration with Python

    Monitor SSL Expiration with Python

    Building a Simple WordPress Post List Tool with PHP

    Building a Simple WordPress Post List Tool with PHP

    Monitoring Web Page Changes with Python

    Monitoring Web Page Changes with Python

    My SSH Setup: How I Manage Multiple Servers

    My SSH Setup: How I Manage Multiple Servers

    Building a Network Tracker Auditor for Privacy with Python

    Building a Network Tracker Auditor for Privacy with Python

  • Blog
    • All
    • Artificial Intelligence
    • Developer Life
    • Privacy
    • Reviews
    • Security
    • Tutorials
    Imposter Syndrome as a Self-Taught Developer

    Imposter Syndrome as a Self-Taught Developer

    Why Stable Websites Outperform Flashy Redesigns

    Why Stable Websites Outperform Flashy Redesigns

    AdGuard Ad Blocker Review

    AdGuard Ad Blocker Review

    Surfshark VPN Review

    Surfshark VPN Review

    Nmap Unleash the Power of Cybersecurity Scanning

    Nmap: Unleash the Power of Cybersecurity Scanning

    Floorp Browser Review

    Floorp Browser Review

    Understanding Man-in-the-Middle Attacks

    Understanding Man-in-the-Middle Attacks

    Privacy-Focused Analytics

    Privacy-Focused Analytics: Balancing Insights and Integrity

    Safeguarding Your Facebook Account

    Safeguarding Your Facebook Account: Understanding the Differences Between Hacking and Cloning

  • Apps
    • Bible App
    • Bible Verse Screensaver
    • Blue AI Chatbot
    • Early Spring Predictor
    • FIGlet Generator
    • Password Generator
    • StegX
    • The Matrix
    • WeatherX
    • Website Risk Level Tool
  • About
    • About JMooreWV
    • Live Cyber Attack Stats
  • Contact
    • General Contact
    • Website Administration & Cybersecurity
No Result
View All Result
  • Home
  • Guides
    • All
    • Linux
    • Programming
    • Tools
    • WordPress
    My Backup Setup for Linux PCs

    My Backup Setup for Linux PCs

    Detecting Hidden WordPress Malware Disguised as Images

    Detecting Hidden WordPress Malware Disguised as Images

    Server-Side Image Conversion with Apache

    Server-Side Image Conversion with Apache

    Fastest Way to Extract a Massive .tar.gz File on Linux

    Fastest Way to Extract a Massive .tar.gz File on Linux

    Monitor SSL Expiration with Python

    Monitor SSL Expiration with Python

    Building a Simple WordPress Post List Tool with PHP

    Building a Simple WordPress Post List Tool with PHP

    Monitoring Web Page Changes with Python

    Monitoring Web Page Changes with Python

    My SSH Setup: How I Manage Multiple Servers

    My SSH Setup: How I Manage Multiple Servers

    Building a Network Tracker Auditor for Privacy with Python

    Building a Network Tracker Auditor for Privacy with Python

  • Blog
    • All
    • Artificial Intelligence
    • Developer Life
    • Privacy
    • Reviews
    • Security
    • Tutorials
    Imposter Syndrome as a Self-Taught Developer

    Imposter Syndrome as a Self-Taught Developer

    Why Stable Websites Outperform Flashy Redesigns

    Why Stable Websites Outperform Flashy Redesigns

    AdGuard Ad Blocker Review

    AdGuard Ad Blocker Review

    Surfshark VPN Review

    Surfshark VPN Review

    Nmap Unleash the Power of Cybersecurity Scanning

    Nmap: Unleash the Power of Cybersecurity Scanning

    Floorp Browser Review

    Floorp Browser Review

    Understanding Man-in-the-Middle Attacks

    Understanding Man-in-the-Middle Attacks

    Privacy-Focused Analytics

    Privacy-Focused Analytics: Balancing Insights and Integrity

    Safeguarding Your Facebook Account

    Safeguarding Your Facebook Account: Understanding the Differences Between Hacking and Cloning

  • Apps
    • Bible App
    • Bible Verse Screensaver
    • Blue AI Chatbot
    • Early Spring Predictor
    • FIGlet Generator
    • Password Generator
    • StegX
    • The Matrix
    • WeatherX
    • Website Risk Level Tool
  • About
    • About JMooreWV
    • Live Cyber Attack Stats
  • Contact
    • General Contact
    • Website Administration & Cybersecurity
No Result
View All Result
Home Guides Programming JavaScript

Add a Google Map to Your Website

Jonathan Moore by Jonathan Moore
5 years ago
Reading Time: 6 mins read
A A
Add a Google Map to Your Website
FacebookTwitter

Google Maps are quite handy when you need to obtain directions to a location. Many service providers will use a Google Map to show where their business is based or the area they service. In this JavaScript guide, I am going to show you how to obtain a Google API Key and use it to create a Google Map with multiple markers.

How to Get an API Key for Google Maps

Before we can use Google Maps, we need to create an API Key. To do this, you will need to visit the following website and create a new project.

https://console.cloud.google.com/projectcreate

Once you are there, you will need to enter a Project Name. This can be any name that helps identify the project that you are creating (ex. My Google Map). After you have decided on a name hit the “Create” button. This will take you to the Dashboard for your new project.

Now head over to the following page to enable the “Maps JavaScript API,” which is the API that we will be using for this project.

https://console.cloud.google.com/apis/library/maps-backend.googleapis.com

After you have enabled the JavaScript API for Google Maps, we will need to head over to the Credentials page.

https://console.cloud.google.com/apis/credentials

Once you have navigated to this page, click on the “Create Credentials” link at the top of the page and choose “API Key”. This will generate the API Key that we will need for the project. Be sure to copy the API Key and save it somewhere safe because we will be needing it later on in this project.

Example API Key:

BmzaTyDxTJXamo4ZtWrCpZEOpJoJ2xz2nbQMuAc

Let’s Get Started

Now that we have our API Key for Google Maps, we can begin writing the code to display a Google Map on our website.

Create an HTML Page

This is the basic HTML for setting up our website to include the Google Map. This template will display a map that is the full height and width of the page. The #map ID within the style tag allows you to further adjust the styling of the map’s DIV container.

<html lang="en">
    <head>
        <meta charset="utf-8" />
        <meta name="viewport" content="width=device-width, initial-scale=1" />
        <style>
            body {
                margin: 0;
            }
            #map {
                height: 100%;
                width: 100%;
                background-color: grey;
            }
        </style>
        <title>My First Google Map</title>
    </head>

    <body>

        <div id="map"></div>

    </body>
</html>

Add the Google Map API

Now that we have our basic HTML setup, it is time to add the script that will allow us to use the Google Maps API.

<script src="https://maps.googleapis.com/maps/api/js?key=YOUR_API_KEY&callback=initMap" async></script>

We will be calling the Google Maps API asynchronously, which means the script will load in the background while the rest of the page continues to load. This script also contains two more important parameters: key and callback. The key will be used to store your API key and the callback is used to call a function that will help define the map. Replace the YOUR_API_KEY value with the API key that you generated earlier.

Now let’s add the script to our previous HTML structure.

<html lang="en">
    <head>
        <meta charset="utf-8" />
        <meta name="viewport" content="width=device-width, initial-scale=1" />
        <style>
            body {
                margin: 0;
            }
            #map {
                height: 100%;
                width: 100%;
                background-color: grey;
            }
        </style>
        <title>My First Google Map</title>
    </head>

    <body>

        <div id="map"></div>

        <script src="https://maps.googleapis.com/maps/api/js?key=YOUR_API_KEY&callback=initMap" async></script>

    </body>
</html>

Adding the Callback

The only thing left before we can display the Google Map is the callback. This is one of the most important pieces of our project. It not only displays the map, but also allows us to define our starting coordinates, markers, and additional options.

function initMap() {
    var mapOptions = {
        center: {
            lat: 39.807305,
            lng: -77.224207
        },
        zoom: 14,
        mapTypeId: 'hybrid'
    };
    var map = new google.maps.Map( document.getElementById( "map" ), mapOptions );
}

The above callback function will display a basic hybrid map with no markers on your page. The center option will center the map to the latitude and longitude coordinates. You can adjust how far or how close you want to view the map with the zoom option. The smaller the zoom number, the further out the zoom level is, and the larger the zoom number, the closer the zoom level is. We can set a map type that is displayed with the mapTypeId option. There are four basic map types that can be used, which are hybrid, satellite, roadmap, and terrain.

How good is a map without markers? A map without markers isn’t very useful. We use markers to show places of interest on a map. In the following function, we are going to be defining several points of interest and generate a marker for each interest on the map.

function create_markers( map ) {
    var marker;
    var infowindow = new google.maps.InfoWindow();

    var markers = [
        ["Delaware State Monument", "39.8161", "-77.23247"],
        ["Indiana State Monument", "39.814138", "-77.216287"],
        ["New York State Monument", "39.8208", "-77.2306"],
        ["New York Auxiliary State Monument", "39.8043", "-77.23445"],
        ["Pennsylvania State Memorial", "39.807588", "-77.235153"],
        ["United States Regulars Monument", "39.811217", "-77.235683"],
        ["United States Signal Corps Marker", "39.79254", "-77.236503"],
        ["Vermont State Monument", "39.80945", "-77.23636"],
    ];

    for ( var i = 0; i < markers.length; i++ ) {
        marker = new google.maps.Marker({
            position: new google.maps.LatLng( markers[i][1], markers[i][2] ),
            map: map
        });

        google.maps.event.addListener( marker, 'click', ( function( marker, i ) { return function() {
            infowindow.setContent( markers[i][0] );
            infowindow.open( map, marker );
        }})(marker, i));
    }

    google.maps.event.addListener( map, 'click', function() {
        infowindow.close();
    });
}

The above function will iterate through a list called markers and create a marker on the map for each item in the list. The first element in each sub-list is the content that will be displayed in an info window when the marker is clicked. The second and third elements in each sub-list are the latitude and longitude for the location. An additional event listener was added outside of the loop to close the info window if the map is clicked.

In order to use the create_markers function, we will need to call it from the initMap function. This will allow the base map to load and then the markers.

function initMap() {
    var mapOptions = {
        center: {
            lat: 39.807305,
            lng: -77.224207
        },
        zoom: 14,
        mapTypeId: 'hybrid'
    };
    var map = new google.maps.Map( document.getElementById( "map" ), mapOptions );
    create_markers( map );
}

Our Final Project

We have gone through each piece of code and it’s now time to put it all together.

<html lang="en">
    <head>
        <meta charset="utf-8" />
        <meta name="viewport" content="width=device-width, initial-scale=1" />
        <style>
            body {
                margin: 0;
            }
            #map {
                height: 100%;
                width: 100%;
                background-color: grey;
            }
        </style>
        <title>My First Google Map</title>
    </head>

    <body>

        <div id="map"></div>

        <script>
            function create_markers( map ) {
                var marker;
                var infowindow = new google.maps.InfoWindow();

                var markers = [
                    ["Delaware State Monument", "39.8161", "-77.23247"],
                    ["Indiana State Monument", "39.814138", "-77.216287"],
                    ["New York State Monument", "39.8208", "-77.2306"],
                    ["New York Auxiliary State Monument", "39.8043", "-77.23445"],
                    ["Pennsylvania State Memorial", "39.807588", "-77.235153"],
                    ["United States Regulars Monument", "39.811217", "-77.235683"],
                    ["United States Signal Corps Marker", "39.79254", "-77.236503"],
                    ["Vermont State Monument", "39.80945", "-77.23636"],
                ];

                for ( var i = 0; i < markers.length; i++ ) {
                    marker = new google.maps.Marker({
                        position: new google.maps.LatLng( markers[i][1], markers[i][2] ),
                        map: map
                    });

                    google.maps.event.addListener( marker, 'click', ( function( marker, i ) { return function() {
                        infowindow.setContent( markers[i][0] );
                        infowindow.open( map, marker );
                    }})(marker, i));
                }

                google.maps.event.addListener( map, 'click', function() {
                    infowindow.close();
                });
            }

            function initMap() {
                var mapOptions = {
                    center: {
                        lat: 39.807305,
                        lng: -77.224207
                    },
                    zoom: 14,
                    mapTypeId: 'hybrid'
                };
                var map = new google.maps.Map( document.getElementById( "map" ), mapOptions );
                create_markers( map );
            }
        </script>

        <script src="https://maps.googleapis.com/maps/api/js?key=YOUR_API_KEY&callback=initMap" async></script>

    </body>
</html>

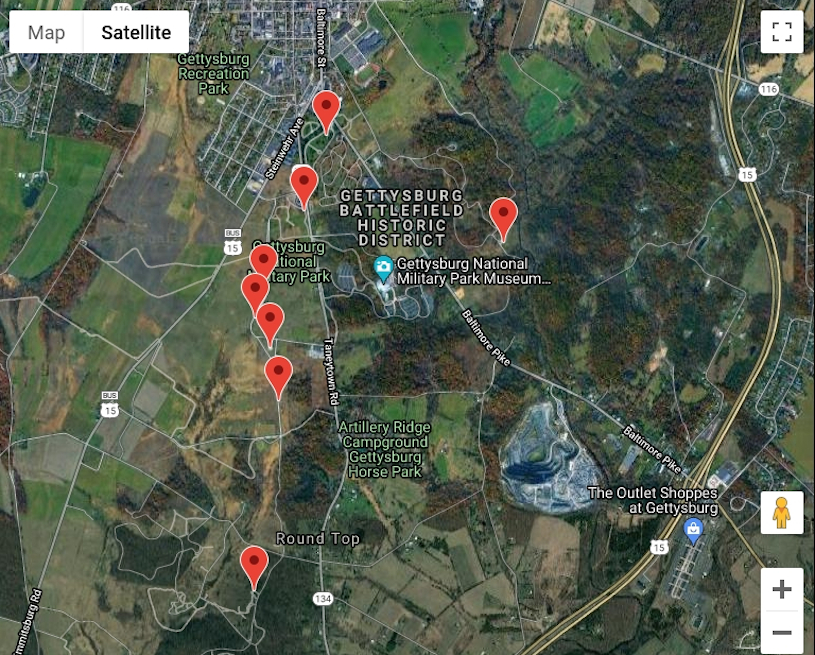
We have completed the guide for adding a Google Map to a website. If you have done everything correctly, your page should display a map similar to the one below. One thing else that I would like to recommend before displaying your map on a public website and that is to restrict your API Key to your website’s domain. This will prevent others from using your API Key to display maps on their websites, which could cause your account to be limited or charged depending on its over-usage.


Tags: Google MapsJavaScriptMapping
ShareTweetSharePinShareShareScan
ADVERTISEMENT
Jonathan Moore

Jonathan Moore

I am a Software Architect and Senior Software Engineer with 30+ years of experience building applications for Linux and Windows systems. I focus on system architecture, custom web platforms, server infrastructure, and security-focused tools, with an emphasis on performance and reliability. Over the years, I have built everything from WordPress plugins and automation systems to full platforms, ad serving systems, monitoring tools, and API-driven applications. I prefer working close to the system, solving real problems, and building tools that are meant to be used.

Related Articles

Calculating the Date of Easter Using the Computus Algorithm

Calculating the Date of Easter Using the Computus Algorithm

Easter is one of the oldest and most significant festivals in the Christian calendar, celebrating the resurrection of Jesus Christ....

Automating JavaScript Minification with PHP

Automating JavaScript Minification with PHP

Automating JavaScript minification with PHP can significantly streamline a developer's workflow. It ensures that the deployed code is always in...

Synonym Word Replacer

Create a Synonym Word Replacer with JavaScript

Writing compelling and engaging content often requires finding the perfect words to convey our thoughts. However, occasionally we find ourselves...

Next Post
Add an OpenStreetMap to Your Website

Add an OpenStreetMap to Your Website

Recommended Services

Latest Articles

My Backup Setup for Linux PCs

My Backup Setup for Linux PCs

March 31st is World Backup Day. It is meant to be a reminder, but I do not rely on reminders...

Read moreDetails

Detecting Hidden WordPress Malware Disguised as Images

Detecting Hidden WordPress Malware Disguised as Images

With the recent discovery of malicious files like Stained_Heart_Red-600x500.png being found on servers across the web, it pushed me to...

Read moreDetails

Server-Side Image Conversion with Apache

Server-Side Image Conversion with Apache

I stopped relying on third party image services a while ago. They work, but they add cost, latency, and another...

Read moreDetails

Imposter Syndrome as a Self-Taught Developer

Imposter Syndrome as a Self-Taught Developer

I started writing code over 35 years ago. Everything I learned came from figuring things out on my own, long...

Read moreDetails
  • Privacy Policy
  • Terms of Service

© 2025 JMooreWV. All rights reserved.

No Result
View All Result
  • Home
  • Guides
    • Linux
    • Programming
      • JavaScript
      • PHP
      • Python
    • Tools
    • WordPress
  • Blog
    • Artificial Intelligence
    • Tutorials
    • Privacy
    • Security
  • Apps
    • Bible App
    • Bible Verse Screensaver
    • Blue AI Chatbot
    • Early Spring Predictor
    • FIGlet Generator
    • Password Generator
    • StegX
    • The Matrix
    • WeatherX
    • Website Risk Level Tool
  • About
    • About JMooreWV
    • Live Cyber Attack Stats
  • Contact
    • General Contact
    • Website Administration & Cybersecurity