


If you’re involved in network administration and cybersecurity or just curious about what’s going on with your network, Nmap is a tool that should be in your toolkit. Nmap (Network Mapper) is a powerful open-source tool used for network discovery and security auditing. It’s capable of scanning a network to identify hosts, services, and their versions, as well as determining the operating systems running on those hosts.
In this guide, we’ll break down how to use Nmap, from basic to advanced usage, and provide some examples to illustrate its capabilities. Whether you’re scanning a local network or auditing a web server, Nmap has the versatility to meet your needs.
Getting Started with Nmap
Installation
Before we dive into how to use Nmap, you’ll need to install it on your system. Nmap is available for Linux, Windows, and macOS.
Linux: Most Linux distributions come with Nmap pre-installed. If not, you can install it via your package manager. For example:
sudo apt install nmap
macOS: You can install Nmap using Homebrew:
brew install nmap
Windows: Download the installer from the official Nmap website.
Once installed, you can verify your installation by running:
nmap -v
Basic Nmap Usage
Simple Ping Scan
To begin with, a basic Nmap scan is just to see if hosts are alive. This is called a “ping scan.” With this scan, Nmap simply checks if a system responds to a ping or not.
Example:
nmap -sn 192.168.1.0/24
This command will check all the hosts in the 192.168.1.0 subnet to see if they are up. The /24 specifies a subnet mask of 255.255.255.0, meaning it will scan all 254 hosts from 192.168.1.1 to 192.168.1.254.
TCP SYN Scan (Default Scan)
One of Nmap’s most commonly used features is the TCP SYN scan, which is the default scan if no specific options are provided. This scan sends SYN packets to a target’s ports, awaiting a response that will indicate the status of the port.
Example:
nmap 192.168.1.105
This will scan the target 192.168.1.105 and display open ports on the system.
You can also specify a range of IPs:
nmap 192.168.1.100-110
Specifying Ports
If you are only interested in scanning a specific port or range of ports, you can use the -p flag.
Example:
nmap -p 22,80,443 192.168.1.105
This command will scan the target IP 192.168.1.105 for open ports 22 (SSH), 80 (HTTP), and 443 (HTTPS).
You can also specify a range of ports:
nmap -p 1-1000 192.168.1.105
This will scan ports 1 through 1000.
Service Version Detection
If you need more details about what services are running on open ports, you can add the -sV flag to detect the version of the services.
Example:
nmap -sV 192.168.1.105
In this scan, Nmap will attempt to determine the version of the service running on each open port, such as Apache, Nginx, SSH, or any other running service.
Advanced Nmap Scanning Techniques
OS Detection
One of Nmap’s powerful features is its ability to detect the operating system running on a target system. By analyzing how the target responds to TCP/IP packets, Nmap can often determine whether the system is running Linux, Windows, macOS, or other operating systems.
Example:
nmap -O 192.168.1.105
This scan attempts to identify the operating system on the target IP.
Aggressive Scan
For a more thorough scan, you can run an “aggressive” scan using the -A option. This scan will combine several features, including OS detection, service version detection, and traceroute.
Example:
nmap -A 192.168.1.105
This aggressive scan provides more detailed information but takes longer to complete. Be cautious, as aggressive scans can sometimes be interpreted as an attack by intrusion detection systems.
Scanning Multiple Targets
Nmap supports several ways of scanning multiple targets at once. You can specify ranges of IP addresses, use CIDR notation, or scan from a list of IPs stored in a file.
Example using a list of IPs:
nmap -iL targets.txt
In this case, targets.txt is a file that contains a list of IPs or hostnames you wish to scan.
UDP Scanning
While TCP is the most common protocol, Nmap can also scan UDP ports using the -sU option. UDP scans are slower because they rely on responses that may not always be provided by the target.
Example:
nmap -sU 192.168.1.105
This will scan for open UDP ports on the target.
Timing Options
When scanning larger networks, you may want to adjust the timing of your scans. Nmap provides the -T option to set the timing template. Timing templates range from -T0 (paranoid, very slow) to -T5 (insane, very fast).
Example:
nmap -T4 192.168.1.105
The -T4 option is a good balance between speed and stealth.
Stealth Scanning
Stealth scans are designed to avoid detection by firewalls and intrusion detection systems. The -sS option sends SYN packets and monitors the responses without completing the TCP handshake.
Example:
nmap -sS 192.168.1.105
This scan is useful if you want to avoid detection but still gather information about open ports.
Scriptable Scanning with Nmap Scripting Engine (NSE)
One of Nmap’s most versatile features is its Nmap Scripting Engine (NSE). NSE allows you to run specialized scripts that can perform tasks like vulnerability detection, brute force attacks, and even network discovery.
To see a list of available scripts, use:
nmap --script-help
Running Scripts
You can run scripts with the –script option. For example, to run a script that checks for vulnerabilities on a web server, you can use:
nmap --script=http-vuln* 192.168.1.105
This command will run all scripts that start with http-vuln on the target web server.
Popular NSE Scripts
Here are a few useful scripts you might want to explore:
http-enum: Enumerates web applications on a web server.
nmap --script=http-enum 192.168.1.105
ftp-anon: Checks if an anonymous FTP login is allowed.
nmap --script=ftp-anon 192.168.1.105
smb-vuln-ms17-010: Checks for the SMB vulnerability used by WannaCry.
nmap --script=smb-vuln-ms17-010 192.168.1.105
Saving Nmap Scan Results
Nmap allows you to save your scan results in multiple formats, including XML and plaintext. This can be helpful for reporting or analyzing the data later.
Save as a plain text file:
nmap -oN output.txt 192.168.1.105
Save as an XML file:
nmap -oX output.xml 192.168.1.105
You can also save in multiple formats at once using the -oA option:
nmap -oA scan_results 192.168.1.105
This will generate scan_results.nmap, scan_results.xml, and scan_results.gnmap.
Scanning External Servers
While Nmap is commonly used for scanning internal networks, it is equally useful for scanning external servers, such as web servers, to gather information about open ports, services, and potential vulnerabilities. However, before scanning any external systems, always ensure that you have explicit permission from the owner, as unauthorized scans can be considered illegal in many jurisdictions.
Nmap’s Public Practice Server: scanme.nmap.org
Nmap provides a public practice server, scanme.nmap.org, specifically designed to let users practice running various scans. This server is hosted by the creators of Nmap, and they encourage users to scan it while respecting a few simple rules:
- Do not scan the server excessively or with high-intensity options.
- Avoid running any kind of denial-of-service attack or exploiting vulnerabilities.
Let’s take a look at how to perform some common scans on the scanme.nmap.org server.
Basic Scan
You can start with a basic TCP SYN scan to discover open ports on the server. This scan will only show open ports, giving a quick overview of the services running.
Example:
nmap scanme.nmap.org
Here is a sample output:
Starting Nmap 7.94SVN ( https://nmap.org ) at 2024-09-30 03:12 EDT
Nmap scan report for scanme.nmap.org (45.33.32.156)
Host is up (0.13s latency).
Other addresses for scanme.nmap.org (not scanned): 2600:3c01::f03c:91ff:fe18:bb2f
Not shown: 992 closed tcp ports (conn-refused)
PORT      STATE    SERVICE
22/tcp    open     ssh
25/tcp    filtered smtp
80/tcp    open     http
135/tcp   filtered msrpc
139/tcp   filtered netbios-ssn
445/tcp   filtered microsoft-ds
9929/tcp  open     nping-echo
31337/tcp open     Elite
In this example, the scan reveals that ports 22 (SSH), 80 (HTTP), 9929 (nping-echo), and 31337 (Elite) are open on the server. Each of these ports corresponds to a service running on the server.
Service Version Detection
To get more details about the services running on each open port, you can use the -sV option to perform service version detection.
Example:
nmap -sV scanme.nmap.org
This will not only list the open ports but also try to determine the version of the services running on them, which can provide useful information for vulnerability assessment.
Example output:
PORT     STATE    SERVICE    VERSION
22/tcp   open     ssh        OpenSSH 6.6.1p1 Ubuntu 2ubuntu2.13 (Ubuntu Linux; protocol 2.0)
80/tcp   open     http       Apache httpd 2.4.7 ((Ubuntu))
9929/tcp open     nping-echo Nping echo
31337/tcp open    Elite      (Not Shown)
As shown in the output, Nmap detects that SSH is being served by OpenSSH 6.6.1, and the HTTP server is running Apache 2.4.7. Such details are important when identifying outdated or vulnerable software.
Aggressive Scan on External Servers
An aggressive scan (-A) combines various techniques such as OS detection, version detection, script scanning, and traceroute to gather a comprehensive view of the target system.
Example:
nmap -A scanme.nmap.org
The aggressive scan is useful when you need more in-depth information about the target system. However, it is also more intrusive, so use it carefully and sparingly when scanning external servers.
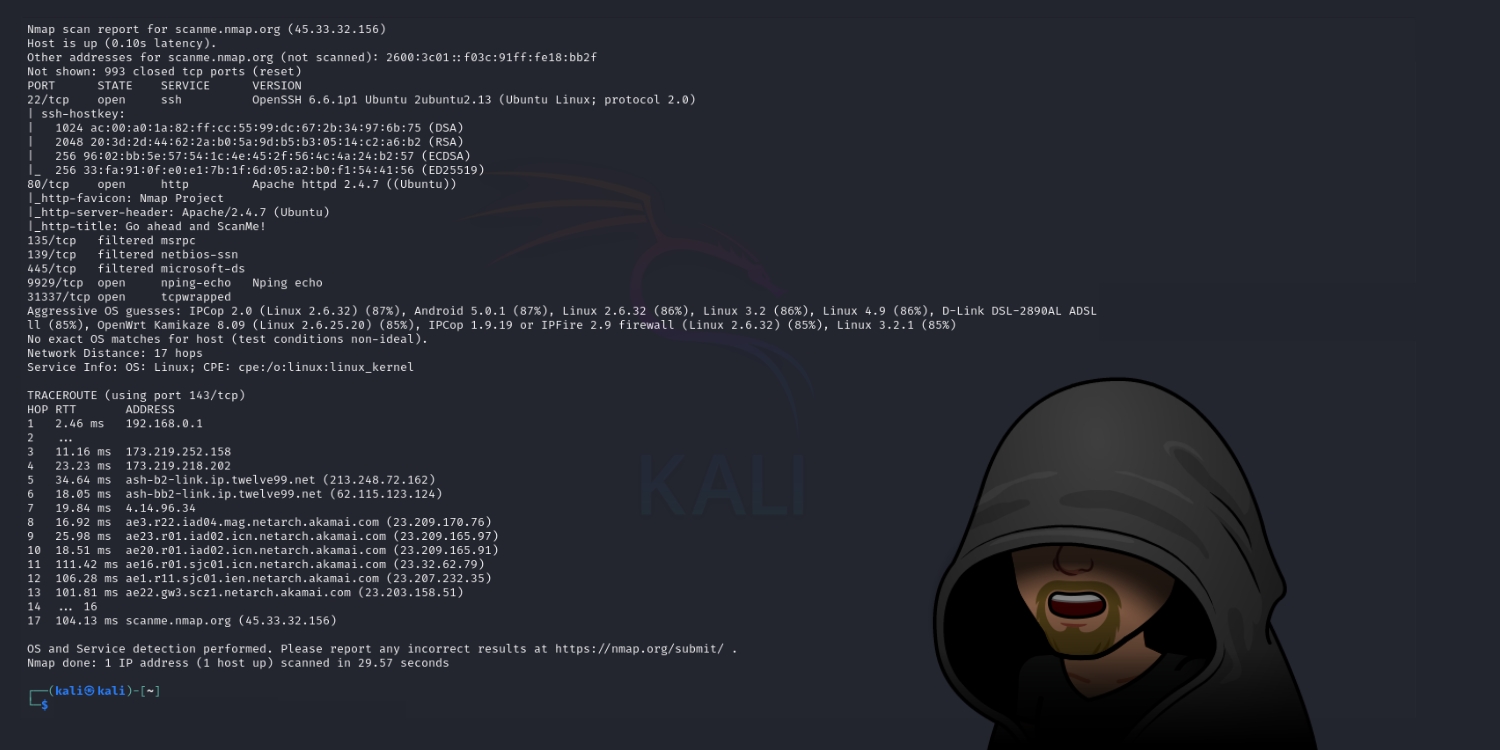
Sample output:
PORT      STATE    SERVICE      VERSION
22/tcp    open     ssh          OpenSSH 6.6.1p1 Ubuntu 2ubuntu2.13 (Ubuntu Linux; protocol 2.0)
| ssh-hostkey:
|   1024 ac:00:a0:1a:82:ff:cc:55:99:dc:67:2b:34:97:6b:75 (DSA)
|   2048 20:3d:2d:44:62:2a:b0:5a:9d:b5:b3:05:14:c2:a6:b2 (RSA)
|   256 96:02:bb:5e:57:54:1c:4e:45:2f:56:4c:4a:24:b2:57 (ECDSA)
|_  256 33:fa:91:0f:e0:e1:7b:1f:6d:05:a2:b0:f1:54:41:56 (ED25519)
25/tcp    filtered smtp
80/tcp    open     http         Apache httpd 2.4.7 ((Ubuntu))
|_http-favicon: Nmap Project
|_http-title: Go ahead and ScanMe!
|_http-server-header: Apache/2.4.7 (Ubuntu)
135/tcp   filtered msrpc
139/tcp   filtered netbios-ssn
445/tcp   filtered microsoft-ds
9929/tcp  open     nping-echo   Nping echo
31337/tcp open     tcpwrapped
Service Info: OS: Linux; CPE: cpe:/o:linux:linux_kernel
Here, the aggressive scan provides detailed information, including the operating system.
Using NSE on External Servers
You can also leverage the Nmap Scripting Engine (NSE) to run security-related scripts against external servers. For example, you can run scripts to check for common vulnerabilities or weaknesses in web servers.
Let’s run an HTTP enumeration script on scanme.nmap.org:
nmap --script=http-enum scanme.nmap.org
This will probe the web server for any known applications or directories exposed to the internet. Scripts like these are useful for identifying misconfigurations or services that might require further hardening.
Saving Results for External Scans
When scanning external servers, it’s often a good practice to save the results for later analysis, especially if you’re conducting a security audit or penetration test.
You can save the results in various formats:
nmap -oN scanme_nmap_results.txt scanme.nmap.org
This command will save the results to a text file for easy viewing later. You can also use XML or other formats to integrate with tools that analyze Nmap outputs.
Ethical Considerations When Scanning External Servers
It’s important to emphasize that scanning external servers can have legal consequences. Always ensure you have explicit permission before scanning any system that you do not own or control. Unauthorized scanning is often considered an attack and could lead to blacklisting, legal repercussions, or disruptions of service.
The scanme.nmap.org server is a great practice environment for testing Nmap skills, but when working with client systems or production environments, always seek proper approval and follow best practices to avoid issues.
Conclusion
Nmap is a powerful, versatile tool that can help you map networks, discover hosts and services, and perform security audits. From simple host discovery to advanced vulnerability scanning, Nmap has features that cater to both beginners and experienced network administrators.
Using Nmap’s public practice server, scanme.nmap.org, is an excellent way to get hands-on experience without risking legal or ethical violations. However, always remember the importance of ethical usage. Nmap is a powerful tool, but with great power comes responsibility. Make sure to follow the rules, obtain permission, and respect the boundaries when scanning external networks and servers.
By mastering Nmap, you’ll gain insight into your network’s security posture and be well-equipped to address any vulnerabilities or misconfigurations.

