During recent data analysis, I needed to view the frequency of words that appeared within a large dataset of 600,000+ records. I put together a word cloud to accomplish this task, which allowed me to see the most used words within the stored dataset.
A word cloud is similar to a tag cloud. It is a cloud filled with many words of different sizes representing its frequency of appearance. In this guide, I will be showing you how to create a basic word cloud and a customized word cloud within Python.
For this example application, we will be using the text from the Constitution of the United States. I will also be introducing you to three new Python libraries that you will need to install before we begin.
Our Requirements
numpy – The numpy library is one of the most popular and helpful libraries to handle multi-dimensional arrays and matrices. It is also used in combination with the Pandas library to perform data analysis. We will be using this to customize our Word Cloud image later.
pip install numpypip install pillowwordcloud – The wordcloud library is the star attraction of the application we are developing. It will take our text and convert it into a cloud of words.
pip install wordcloudAs mentioned, we will be using the text from the Constitution of the United States as our dataset. Click on the following link to download the file and save it within the same directory that you will be using for this Python application.
Download: constitution.txt
Let's Get Started
Now that you have your environment set up, it is time to get started with the basics. I will be showing you how to create a basic word cloud and then a custom word cloud as displayed in the featured image of this guide. As with my previous Python guides, I will be explaining what each line does within the code.
#!/usr/bin/python3

from PIL import Image
from wordcloud import WordCloud, STOPWORDS


def create_wordcloud():
    # Use the built-in list of words to be eliminated from the word cloud
    stopwords = set(STOPWORDS)

    # Open the text file and save it into memory as a variable
    text = open('constitution.txt', encoding='utf-8').read()

    # Pass the text to the WordCloud function with parameters
    # and generate the word cloud data object
    wc = WordCloud(
        mode             = "RGBA",
        background_color = "black",
        colormap         = "RdYlBu",
        width            = 815,
        height           = 486,
        random_state     = 6,
        max_words        = 600,
        stopwords        = stopwords,
        collocations     = True
    ).generate(text)

    # Save the word cloud data as an image
    wc.to_file('constitution_cloud.png')


if __name__ == "__main__":
    # Call the create_wordcloud function
    create_wordcloud()
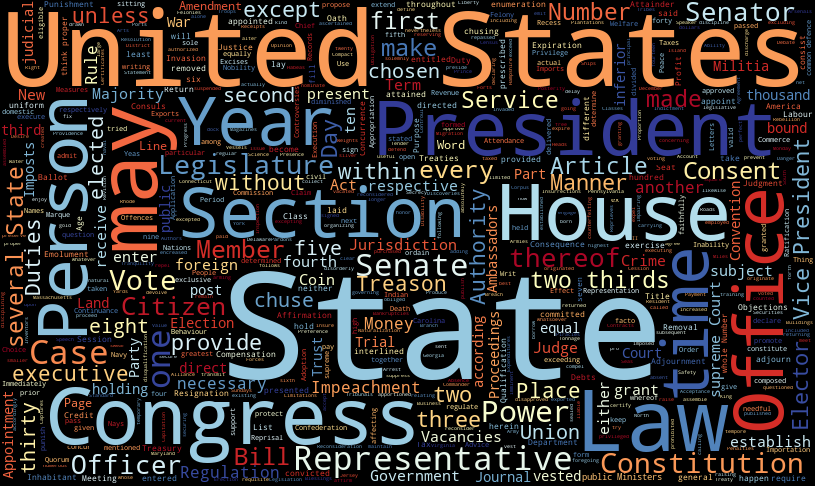
In the above code, we generated a rectangular image that was 815×486 pixels in size and filled with popular words from the Constitution of the United States. Your generated image should look similar to the one below.
WordCloud Parameters
The WordCloud library has several parameters that can be passed to the WordCloud function before the image is generated. These settings will help you to customize the appearance of your word cloud. Here is a reference list for those parameters.
Parameters
___________________________________________________________________________

font_path : string
    Font path to the font that will be used (OTF or TTF).
    Defaults to DroidSansMono path on a Linux machine. If you are on
    another OS or don't have this font; you need to adjust this path.

width : int (default=400)
    Width of the canvas.

height : int (default=200)
    Height of the canvas.

prefer_horizontal : float (default=0.90)
    The ratio of times to try horizontal fitting as opposed to vertical.
    If prefer_horizontal < 1, the algorithm will try rotating the word if
    it doesn't fit. (There is currently no built-in way to get only
    vertical words.) mask : nd-array or None (default=None) If not None,
    gives a binary mask on where to draw words. If mask is not None, width
    and height will be ignored, and the shape of mask will be used instead.
    All white (#FF or #FFFFFF) entries will be considered “masked out”
    while other entries will be free to draw on. [This changed in the most
    recent version!] contour_width: float (default=0) If mask is not None
    and contour_width > 0, draw the mask contour.

contour_color: color value (default=”black”)
    Mask contour color.

scale : float (default=1)
    Scaling between computation and drawing. For large word-cloud images,
    using scale instead of larger canvas size is significantly faster, but
    might lead to a coarser fit for the words.

min_font_size : int (default=4)
    Smallest font size to use. Will stop when there is no more room in this
    size.

font_step : int (default=1)
    Step size for the font. font_step > 1 might speed up computation but
    give a worse fit.

max_words : number (default=200)
    The maximum number of words.

stopwords : set of strings or None
    The words that will be eliminated. If None, the build-in STOPWORDS
    list will be used.

background_color : color value (default=”black”)
    Background color for the word cloud image.

max_font_size : int or None (default=None)
    Maximum font size for the largest word. If None, the height of the image
    is used.

mode : string (default=”RGB”)
    Transparent background will be generated when mode is “RGBA” and
    background_color is None.

relative_scaling : float (default=0.5)
    Importance of relative word frequencies for font-size.  With
    relative_scaling=0, only word-ranks are considered.  With
    relative_scaling=1, a word that is twice as frequent will have twice
    the size.  If you want to consider the word frequencies and not only
    their rank, relative_scaling around .5 often looks good.

color_func : callable, default=None
    Callable with parameters word, font_size, position, orientation,
    font_path, random_state that returns a PIL color for each word.
    Overwrites “colormap”.
    See colormap for specifying a matplotlib colormap instead.

regexp : string or None (optional)
    Regular expression to split the input text into tokens in process_text.
    If None is specified, “r”\w[\w']+”“ is used.

collocations : bool, default=True
    Whether to include collocations (bigrams) of two words.

colormap : string or matplotlib colormap, default=”viridis”
    Matplotlib colormap to randomly draw colors from for each word.
    Ignored if “color_func” is specified.

normalize_plurals : bool, default=True
    Whether to remove trailing ‘s' from words. If True and a word
    appears with and without a trailing ‘s', the one with trailing ‘s'
    is removed and its counts are added to the version without
    trailing ‘s' — unless the word ends with ‘ss'.


Attributes
___________________________________________________________________________

“words_” : dict of string to float
    Word tokens with associated frequency.

    .. versionchanged: 2.0
        “words_” is now a dictionary

“layout_” : list of tuples (string, int, (int, int), int, color))
    Encodes the fitted word cloud. Encodes for each word the string, font
    size, position, orientation, and color.
There is one special parameter called colormap. This parameter is used to change the colors of the text within the word cloud. There are several sets of colors that you can choose from and picking the right set depends on the colors that you want to use. Here is a list of the colormaps that are available and please note, they are case-sensitive:
Accent, Accent_r, afmhot, afmhot_r, autumn, autumn_r, binary, binary_r, Blues, Blues_r, bone, bone_r, BrBG, BrBG_r, brg, brg_r, BuGn, BuGn_r, BuPu, BuPu_r, bwr, bwr_r, cividis, cividis_r, CMRmap, CMRmap_r, cool, cool_r, coolwarm, coolwarm_r, copper, copper_r, cubehelix, cubehelix_r, Dark2, Dark2_r, flag, flag_r, gist_earth, gist_earth_r, gist_gray, gist_gray_r, gist_heat, gist_heat_r, gist_ncar, gist_ncar_r, gist_rainbow, gist_rainbow_r, gist_stern, gist_stern_r, gist_yarg, gist_yarg_r, GnBu, GnBu_r, gnuplot, gnuplot2, gnuplot2_r, gnuplot_r, gray, gray_r, Greens, Greens_r, Greys, Greys_r, hot, hot_r, hsv, hsv_r, inferno, inferno_r, jet, jet_r, magma, magma_r, nipy_spectral, nipy_spectral_r, ocean, ocean_r, Oranges, Oranges_r, OrRd, OrRd_r, Paired, Paired_r, Pastel1, Pastel1_r, Pastel2, Pastel2_r, pink, pink_r, PiYG, PiYG_r, plasma, plasma_r, PRGn, PRGn_r, prism, prism_r, PuBu, PuBu_r, PuBuGn, PuBuGn_r, PuOr, PuOr_r, PuRd, PuRd_r, Purples, Purples_r, rainbow, rainbow_r, RdBu, RdBu_r, RdGy, RdGy_r, RdPu, RdPu_r, RdYlBu, RdYlBu_r, RdYlGn, RdYlGn_r, Reds, Reds_r, seismic, seismic_r, Set1, Set1_r, Set2, Set2_r, Set3, Set3_r, Spectral, Spectral_r, spring, spring_r, summer, summer_r, tab10, tab10_r, tab20, tab20_r, tab20b, tab20b_r, tab20c, tab20c_r, terrain, terrain_r, turbo, turbo_r, twilight, twilight_r, twilight_shifted, twilight_shifted_r, viridis, viridis_r, winter, winter_r, Wistia, Wistia_r, YlGn, YlGn_r, YlGnBu, YlGnBu_r, YlOrBr, YlOrBr_r, YlOrRd, YlOrRd_rCustom Word Cloud Design
Now that we have learned how to create a basic word cloud, it is time to move on to creating a custom-designed word cloud. These are really much easier to do than they sound. The most difficult part is finding or creating a good base image to use as the mask. I have found it easier to use just a black-and-white image since the background of the image has to be pure white (255, 255, 255). The black part of the image gets replaced with the text of the word cloud.
Being such a great sport that I am, I included the base image that I used for the featured image of this guide. Click on the following link to download the file and save it within the same directory that you will be using for this Python application.
Download: usmap.jpg
We are only making two changes to the previous code. We are going to import the numpy library to help us mask the word cloud image and we will be passing the mask parameter to the WordCloud function.
#!/usr/bin/python3

import numpy as np
from PIL import Image
from wordcloud import WordCloud, STOPWORDS


def create_wordcloud():
    # Use the built-in list of words to be eliminated from the word cloud
    stopwords = set(STOPWORDS)

    # Load the base image into a numpy array and store the
    # array within the mask variable
    mask = np.array(Image.open("usmap.jpg"))

    # Open the text file and save it into memory as a variable
    text = open('constitution.txt', encoding='utf-8').read()

    # Pass the text to the WordCloud function with parameters
    # and generate the word cloud data
    wc = WordCloud(
        mode             = "RGBA",
        background_color = "black",
        colormap         = "RdYlBu",
        width            = 815,
        height           = 486,
        random_state     = 6,
        max_words        = 600,
        stopwords        = stopwords,
        mask             = mask,
        collocations     = True
    ).generate(text)

    # Save the word cloud data as an image
    wc.to_file('constitution_cloud.png')


if __name__ == "__main__":
    # Call the create_wordcloud function
    create_wordcloud()
We didn't change any other parameters within the code. After you have executed the application, you should have generated an image very similar to the featured image of this guide. I encourage you to explore the WordCloud library in further depth and to play around with different mask images.


