


When I am dealing with a 40GB or 50GB website backup, I do not just run tar -xzf file.tar.gz and walk away. On large archives, that approach wastes CPU resources, underutilizes available cores, and gives me no visibility into progress. If I am restoring production data or extracting a single directory from a massive archive, I want it done as fast as possible and I want to see what is happening.
This is the exact approach I use on Linux systems when extracting very large .tar.gz files. I will cover parallel decompression with pigz, progress monitoring, partial extraction, and performance tuning so you can get through large archives without waiting all night.
Why Standard tar Is Slow on Large Archives
The default tar -xzf archive.tar.gz command works fine for small backups. The problem appears when the archive grows into the tens of gigabytes. The bottleneck is not usually tar itself. It is the single threaded gzip decompression that happens behind the scenes.
By default, gzip only uses 1 CPU core. On a 4 core or 8 core system, that means most of your CPU sits idle while 1 core handles decompression. On modern SSD storage, the disk can often handle more throughput than a single core can decompress.
When I see all cores hovering around 20 percent usage, I know I am leaving performance on the table. That is where pigz comes in.
Install pigz for Parallel Decompression
pigz stands for parallel implementation of gzip. It is fully compatible with .gz files but can use multiple CPU cores. On most Linux distributions, it is available in the default repositories.
On Debian or Ubuntu based systems:
sudo apt install pigz
On RHEL, AlmaLinux, or Rocky Linux:
sudo dnf install pigz
Once installed, you can verify it with:
pigz --version
Now we can replace the single threaded decompression step with a multi core version.
Fastest Full Extraction Method
Instead of letting tar call gzip internally, I pipe the archive through pigz and feed it into tar manually.
Here is the method I use most often:
pigz -dc -p 4 archive.tar.gz | tar -xvf - -C /destination/path
Let me break that down clearly.
-dtells pigz to decompress-csends output to stdout-p 4uses 4 CPU threads-Cchanges the extraction directory
On a 4 core system, this immediately drives CPU usage much higher and shortens extraction time significantly. On larger systems, you can increase the thread count to match your core count.
If you want to automatically use all available cores, you can use:
pigz -dc archive.tar.gz | tar -xvf - -C /destination/path
Pigz will detect the CPU count automatically.
On large archives, I have seen extraction times cut nearly in half compared to the standard tar -xzf approach.
Adding Progress Visibility
One thing I dislike about plain extraction is that it feels blind. With a 50GB archive, you do not want to stare at a frozen terminal.
1. Use Verbose Mode
Adding -v to tar shows each file as it extracts:
pigz -dc archive.tar.gz | tar -xvvf - -C /destination/path
This confirms that extraction is progressing. It does not show percentage completion, but it does show activity.
2. Use pv for Real Progress
If you want a proper progress bar with throughput statistics, install pv.
On Debian or Ubuntu:
sudo apt install pv
On RHEL based systems:
sudo dnf install pv
Now you can insert pv into the pipeline:
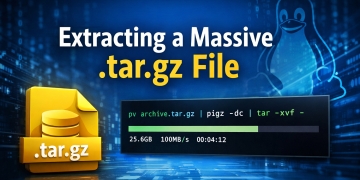
pv archive.tar.gz | pigz -dc | tar -xvf - -C /destination/path
This displays total bytes processed, transfer speed, and estimated time remaining. When I am restoring production backups, this gives me confidence that the system is working as expected.
Extracting Only One Directory from a Massive Archive
Sometimes I do not need the entire archive. I may only need something like sites/www.example.com from a 47GB backup.
The slow mistake is listing everything first with:
tar -tzf archive.tar.gz
That forces a full decompression pass just to show file names. On very large archives, this can take a long time.
Instead, I extract only the path I need:
pigz -dc archive.tar.gz | tar -xvf - -C /destination/path 2025-12-28/sites/www.example.com
Tar will still scan the archive stream, but it only writes the requested path to disk. This reduces disk activity and speeds up the process when the archive contains tens of thousands of files.
If you are unsure of the internal path, you can inspect a small portion with:
pigz -dc archive.tar.gz | tar -tvf - | head
This avoids generating a massive file listing in your terminal.
Decompress First, Then Extract
On some systems, I prefer to separate decompression from extraction. This works well when disk speed is high and CPU is the primary bottleneck.
Step 1: Decompress the archive using all cores:
pigz -d -p 4 archive.tar.gz
This produces:
archive.tar
Step 2: Extract the uncompressed tar file:
tar -xvf archive.tar -C /destination/path
This method is useful if you need to reuse the uncompressed tar file multiple times. It also allows the decompression stage to complete as fast as possible without tar running simultaneously.
However, this requires enough disk space to hold both the compressed and uncompressed versions.
CPU and IO Tuning
Extraction speed depends on 3 main factors: CPU decompression speed, disk write performance, and filesystem overhead.
If your CPU usage remains low even with pigz, your disk may be the bottleneck. SSD storage makes a noticeable difference compared to spinning disks.
If your disk is fast but CPU usage is low, verify pigz thread usage:
htop
Make sure all cores are active during decompression.
If you are extracting millions of small files, filesystem overhead can slow things down. In those cases, extracting to a fast local SSD and then moving the directory may improve total time.
Using ionice for System Stability
On production systems, I sometimes reduce IO priority so extraction does not impact running services.
ionice -c2 -n7 pigz -dc archive.tar.gz | tar -xvf - -C /destination/path
This tells the kernel to treat the extraction as low priority disk activity. The process still runs quickly, but it yields to more important tasks.
This is useful when restoring backups on a live server that is still handling traffic.
Benchmarking the Difference
On a 4 core system with SSD storage, here is what I typically see with a 40GB archive.
Standard method:
tar -xzf archive.tar.gz
CPU usage around 20 to 25 percent. Time significantly longer.
Parallel method:
pigz -dc -p 4 archive.tar.gz | tar -xf -
CPU usage 80 to 100 percent. Time noticeably reduced.
The exact improvement depends on hardware, but parallel decompression almost always wins on multi core systems.
Common Mistakes That Slow Things Down
One issue I see often is running extraction on network mounted storage. If your destination path is over NFS or SMB, network speed becomes the bottleneck. Extracting locally and then transferring the final directory is often faster.
Another issue is trying to list the entire archive repeatedly while troubleshooting. Each tar -tzf call forces a full decompression scan. On a 50GB file, that is expensive.
Also avoid running extraction inside heavily loaded containers with CPU limits. Pigz cannot use cores that the container is not allowed to access.
My Recommended Default Command
When I need the fastest practical extraction on a typical Linux server, this is the command I use:
pv archive.tar.gz | pigz -dc | tar -xvf - -C /destination/path
It gives me multi core decompression, real time progress visibility, and clean extraction to a specific directory.
Final Thoughts
Large .tar.gz archives are common in full website backups and system snapshots. The default extraction command works, but it does not take advantage of modern multi core hardware.
By using pigz for parallel decompression and optionally pv for progress tracking, you can significantly reduce extraction time and improve visibility during long restores. On systems with SSD storage and multiple cores, the difference is immediate.
When I am working with 40GB or 50GB archives, this approach saves real time and keeps CPU resources fully utilized. If you are managing servers, restoring backups, or migrating large sites, switching to parallel extraction is one of the simplest performance improvements you can make.


